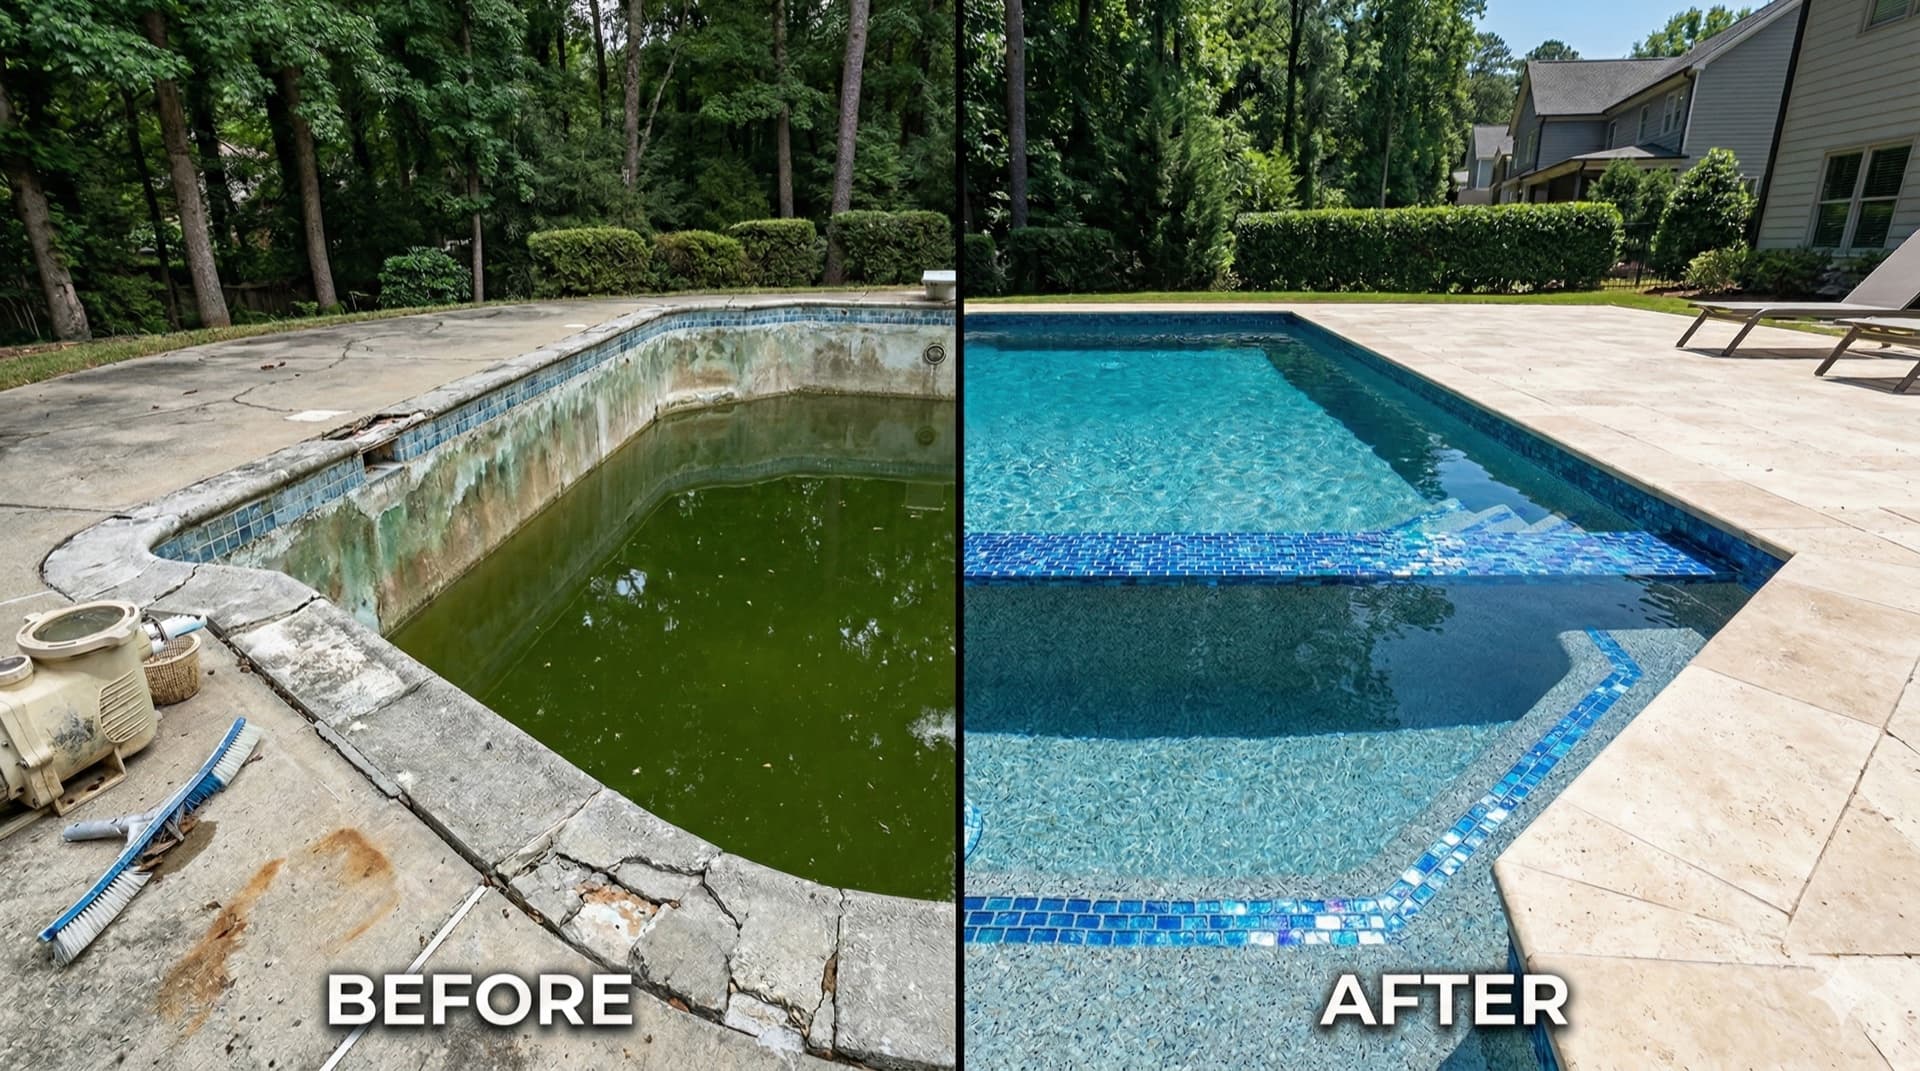
If you've never had a pool resurfaced, the process can feel like a black box. You know it involves draining the pool and applying a new finish, but what actually happens during each phase — and what should you expect to see in your backyard?
Here's a walk-through of the full resurfacing process, step by step, so you know what's normal, what to watch for, and why each phase matters.
Step 1: Draining the Pool
The first step is pumping all the water out. This takes 8 to 14 hours depending on pool size and the pump used. The water is discharged according to local regulations — in most Metro Atlanta jurisdictions, dechlorinated pool water can be discharged to the yard or storm drain, but requirements vary by city.
What you'll see: A large submersible pump in the deep end with a discharge hose running to the drain or yard. The pool empties from bottom up, with the shallow end draining first.
What matters: The pool should be fully drained before any prep work begins. Residual water in the deep end gets pumped or scooped out manually.
Timing: Same day. By the next morning, the pool is dry and ready for prep.
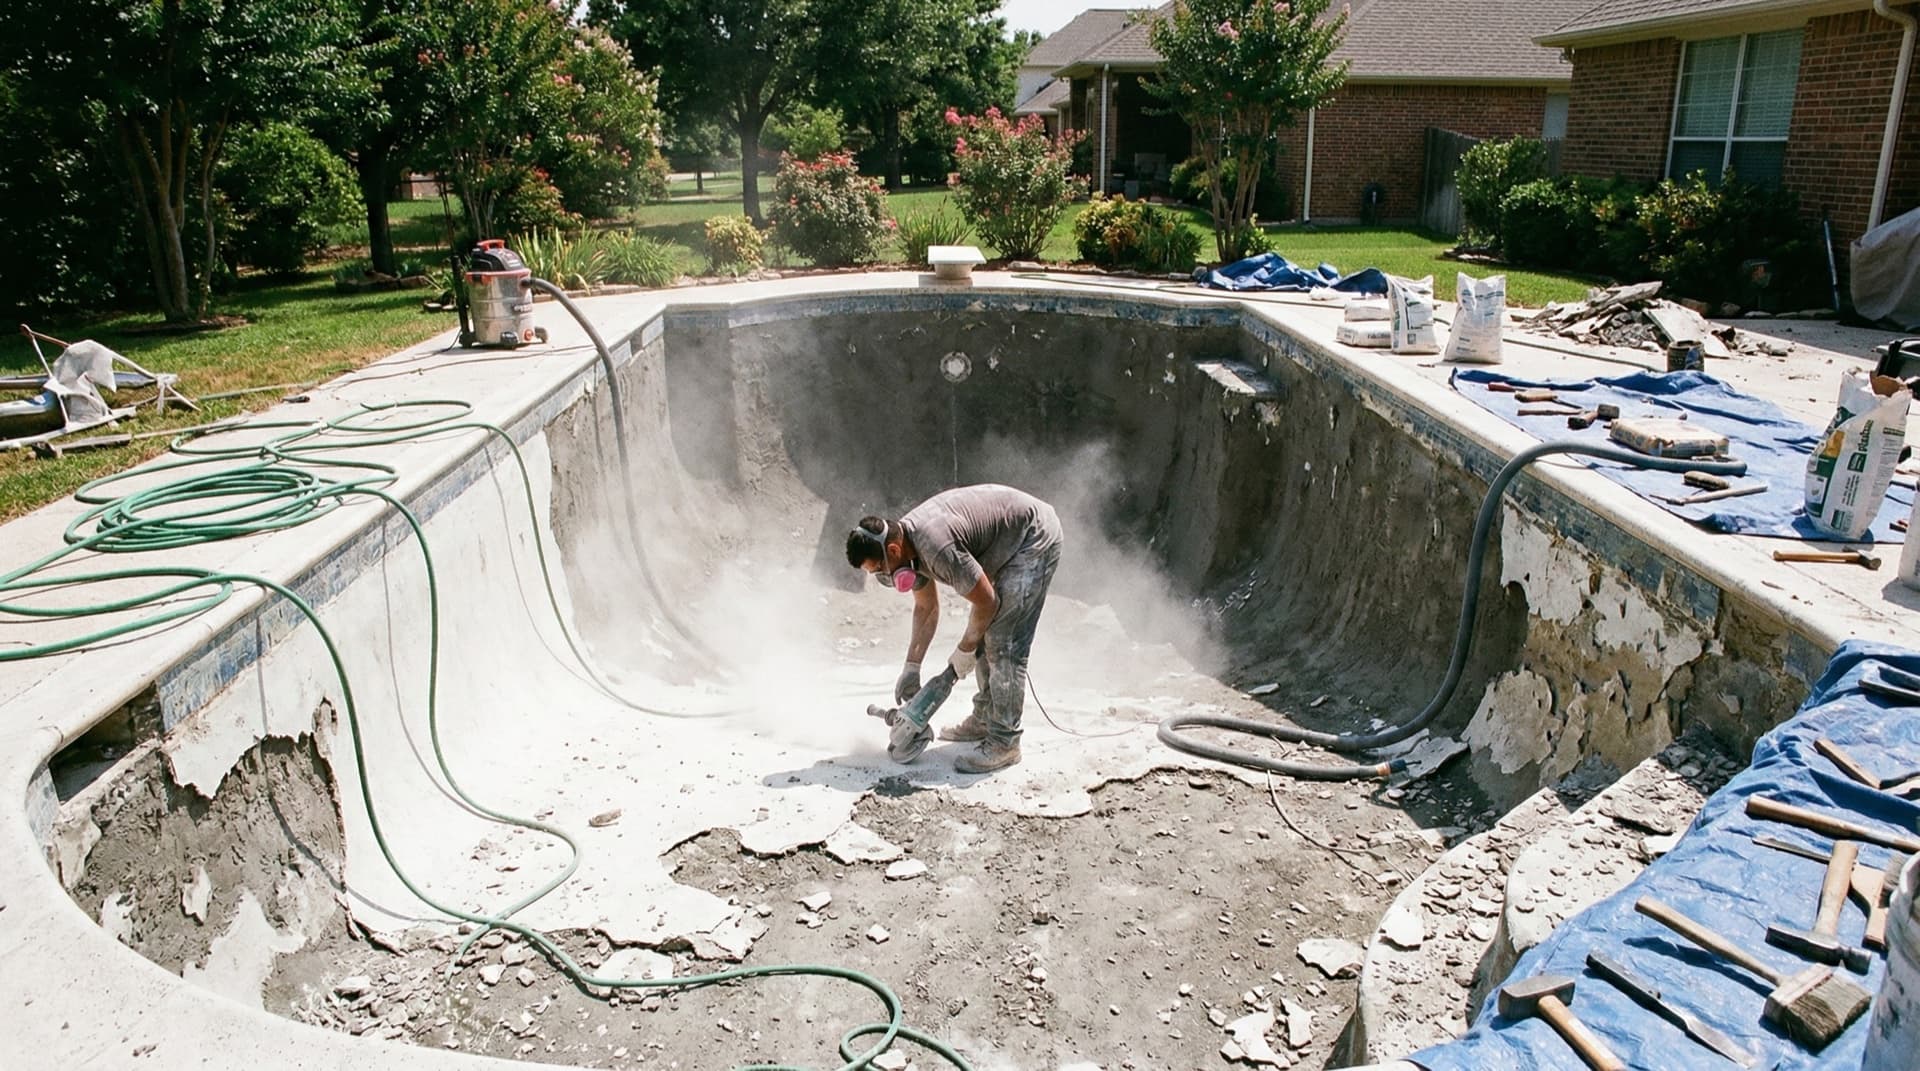
Step 2: Surface Preparation (Chipping and Bond Coat)
This is where the heavy work happens. The existing surface — whether it's old plaster, quartz, or pebble — needs to be prepared so the new finish bonds properly.
For pools with deteriorated plaster, the crew chips or grinds the surface to remove loose material and create a rough profile for the new finish to grip. This is loud and dusty work — expect the sound of pneumatic chipping tools for most of the day.
For pools where the existing surface is sound but worn, a bond coat (a cementitious adhesive layer) may be applied instead of full removal. The bond coat creates the grip surface without the demolition.
What you'll see: The crew working inside the empty pool with chipping hammers and grinders. The pool walls and floor will look rough and raw — exposed concrete or gunite. Debris gets removed by wheelbarrow.
What matters: Thorough surface prep is the single most important factor in how long your new finish lasts. Cutting corners here — leaving loose material, skipping areas, not cleaning properly — leads to delamination and peeling within a few years. This is where experience matters most.
Timing: 1 to 2 days depending on pool size and condition.
Step 3: Bond Beam and Structural Repair
With the pool drained and the surface prepped, structural issues become visible. The bond beam (the concrete lip at the top of the pool wall where coping sits) gets inspected for cracks, rebar exposure, and deterioration. Any cracks in the pool shell — walls or floor — get assessed and repaired.
What you'll see: The crew examining the top edge of the pool and the walls/floor closely. If repairs are needed, you'll see concrete patching, rebar treatment (wire brushing and epoxy coating), and mortar work.
What matters: This is the phase where hidden problems surface. A pool that looked fine with water in it may show cracks, hollow spots, or beam damage once drained. An experienced crew expects this and handles it as part of the process. A less experienced crew may need to stop and figure out a plan.
Timing: Concurrent with surface prep, or 1 additional day if significant repairs are needed.
Step 4: Tile Installation
If you're replacing the waterline tile (and you should — new surface with old tile looks wrong), this happens after surface prep and before the new finish is applied.
The old tile is removed, the substrate is cleaned and leveled, and new tile is set in thin-set mortar. The tile line needs to be level all the way around the pool — even a slight deviation is visible once the pool is full and the water line sits against it.
What you'll see: The tile installer (at Cornerstone, that's us — tile is our specialty) working around the pool's perimeter, setting and cutting tile. For glass mosaic tile, each sheet is placed and adjusted to align patterns across the full run. For hand-cut tile or custom mosaics, expect detailed cutting work.
What matters: Tile layout and level accuracy. Corners, curves, and the points where tile meets coping and meets the pool surface are the details that separate quality work from average work. Ask to see close-up photos of a contractor's tile work before hiring them.
Timing: 1 to 2 days depending on the tile complexity and pool perimeter length.
Step 5: Coping Installation (If Included)
If you're replacing the coping as part of the renovation, it's installed after tile and before the surface finish. The old coping is removed, the bond beam is prepped, and new coping stones are set in mortar, leveled, and grouted.
What you'll see: Coping stones laid out around the pool perimeter, then mortared and grouted into place. For freeform pools, each stone gets custom-cut to follow the curves.
What matters: The coping needs to be perfectly level and properly sloped so splash water drains away from the pool, not back into it. The joint between coping and the new surface needs to be clean — this transition is one of the most visible details on the finished pool.
Timing: 1 to 2 days.
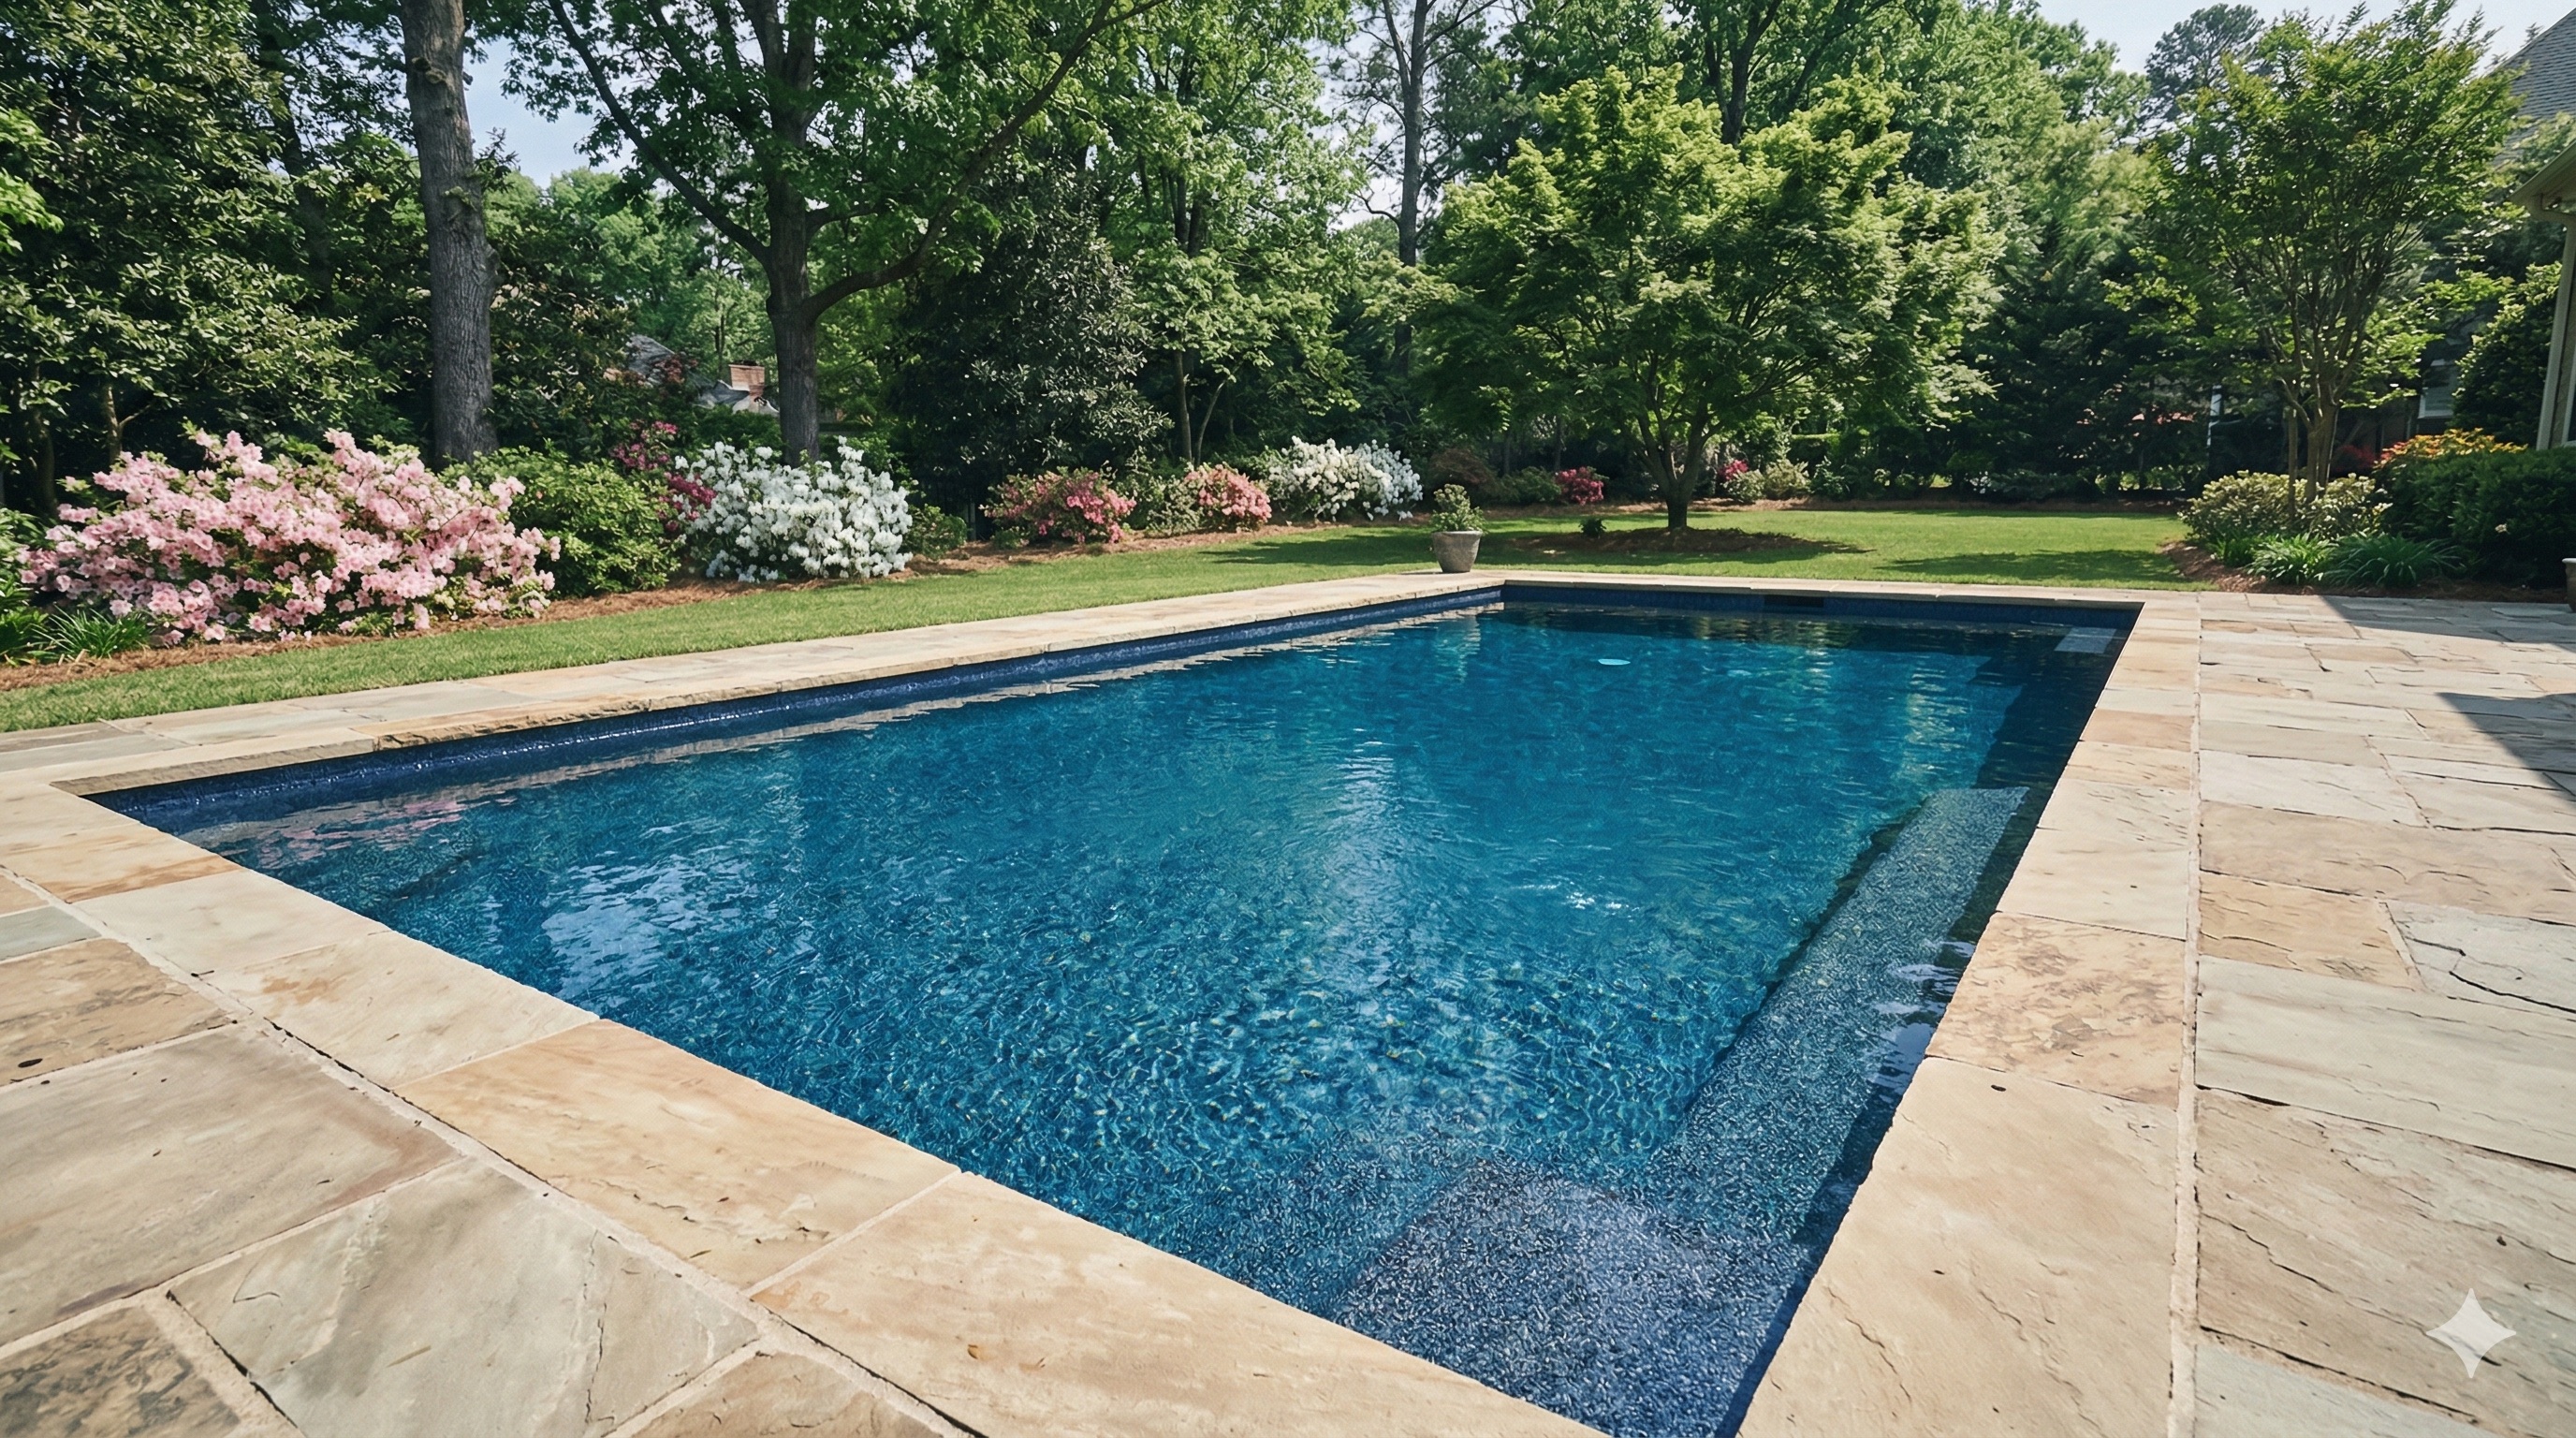
Step 6: Surface Application
This is the main event — applying the new pebble, quartz, or plaster finish.
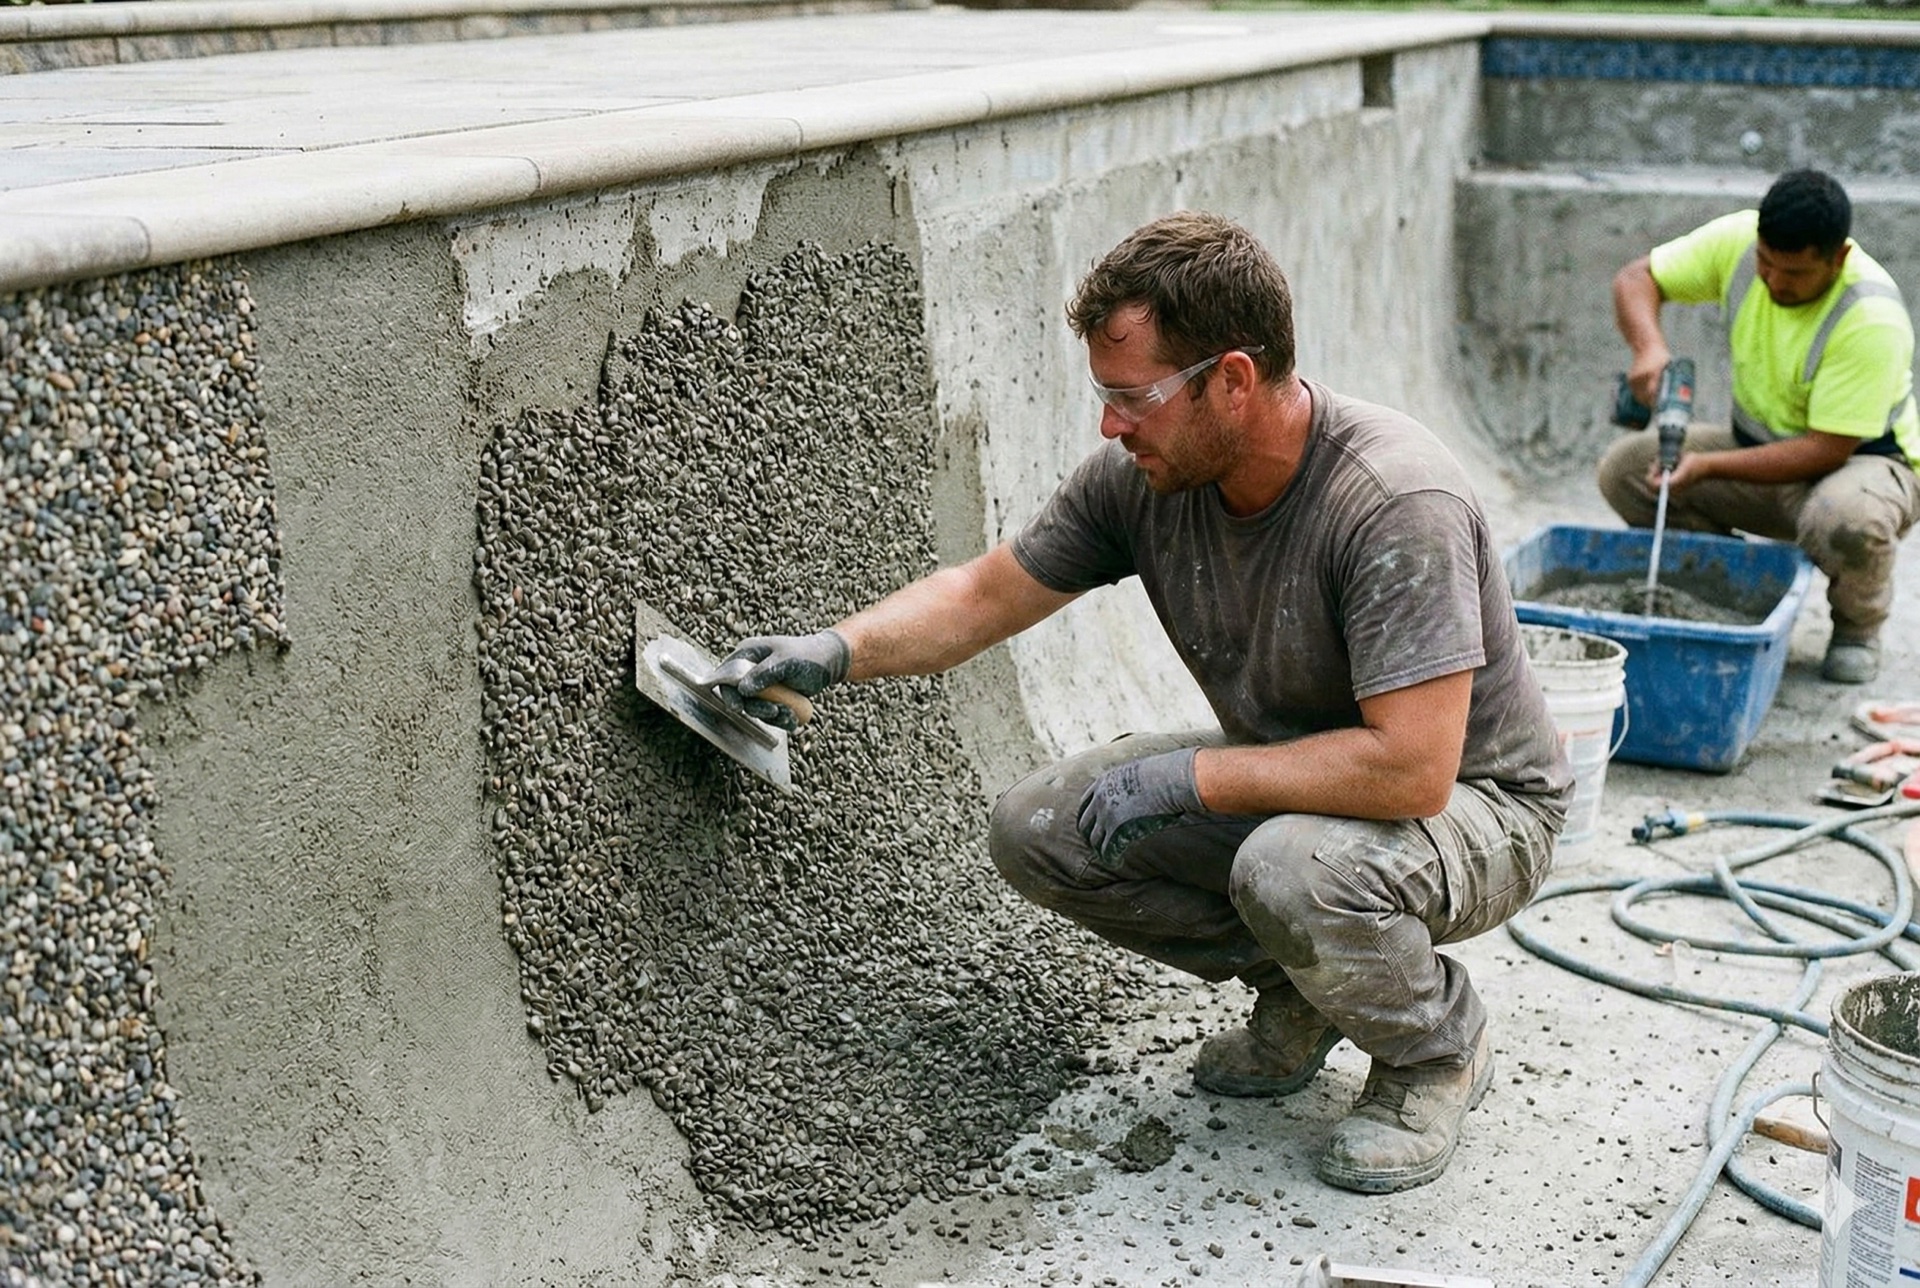
The finish material is mixed on site to exact specifications. For pebble finishes like StoneScapes, the mix includes the pebble aggregate, white cement, and any color additives. The material is hand-troweled onto the pool walls and floor in a consistent layer.
The application starts at the top of the walls and works down. The crew works continuously — once the mix starts going on, it needs to be completed without stopping. This means the full pool shell gets its new surface in a single application session.
What you'll see: A crew of 4 to 6 people working inside the pool simultaneously. Material is mixed in batches and passed to the applicators on the walls. The pace is steady and fast — the material has a working window before it sets.
What matters: Consistency of thickness, smoothness of application, and the troweling technique. An experienced crew applies the finish at a uniform thickness (typically 3/8" to 1/2" for pebble) with consistent aggregate exposure across the entire surface. Uneven application leads to color variation and premature wear in thin spots.
Timing: 1 day for application. This is an all-hands, full-day effort.
Step 7: Curing
After the surface is applied, it needs time to cure — the chemical process where the cement component hardens and reaches its full strength. During curing, the surface must be kept moist. The crew starts a slow fill or applies a curing compound.
What you'll see: The pool filling very slowly — a garden hose trickling into the deep end — or the surface being misted periodically.
What matters: The cure cannot be rushed. Filling too fast, letting the surface dry out, or exposing it to direct sun during the initial cure can cause cracking, discoloration, and reduced durability. Temperature matters too — Georgia's summer heat accelerates curing but also increases the risk of too-fast drying.
Timing: 5 to 7 days from application to full pool fill.
Step 8: Fill and Chemical Startup
Once curing is complete, the pool fills to operating level. Then the real chemistry work begins — balancing pH, alkalinity, calcium hardness, and chlorine to protect the new surface and achieve clear water.
What you'll see: The pool filling from a garden hose (or sometimes a water truck for faster fill). Once full, the pump runs 24/7 for the first week while chemistry stabilizes. The water may be cloudy initially — this is normal as plaster dust and mineral residue clear.
What matters: Startup chemistry is critical for a new surface. The water needs to be balanced carefully to avoid staining or etching the fresh finish during its most vulnerable period. We provide detailed startup instructions and check the water chemistry during the initial week.
Timing: 1 to 3 days to fill, 5 to 7 days of startup chemistry management. Swimming is typically safe after the startup period once chemistry holds stable.
The Full Timeline at a Glance
For a resurfacing + tile + coping project:
Drain: Day 1. Prep and repair: Days 2–3. Tile: Days 4–5. Coping: Days 5–6. Surface application: Day 7. Cure: Days 8–14. Fill and startup: Days 15–18.
Active work on site: 7 to 10 days. Total time from drain to swimming: 3 to 5 weeks including cure and fill.
For a full renovation that includes deck work, add 1 to 3 weeks depending on deck scope.
What to Watch For During Your Project
A few things that indicate quality work is happening:
The crew preps thoroughly before applying anything. If surface prep takes longer than you expected, that's a good sign — it means they're not cutting corners.
The tile line looks dead level all the way around. Ask your contractor about this specifically — it's one of the easiest quality checks you can do.
The surface application involves a full crew working in coordination. This isn't a one-person job — it requires a team that's done it together before.
The cure phase is respected. If a contractor wants to fill fast to "save time," that's a red flag. The cure protects your investment for the next 10 to 15 years.
What a Resurfacing Actually Looks Like: Day by Day
A homeowner in Dunwoody wanted their renovation timeline documented so they could plan around the work. The pool was a 2003-era 400-square-foot kidney shape with original white plaster, cracked precast coping, and ceramic waterline tile. Here's how the project actually unfolded:
Day 1: Pool drained by mid-afternoon. Crew cleaned the bottom and started surface inspection. Found two hairline cracks in the floor and moderate bond beam deterioration along the south wall.
Days 2–3: Full surface prep — chipping the old plaster, treating exposed rebar on the beam, patching the floor cracks with hydraulic cement. The beam repair added half a day but was caught at the right stage.
Day 4: Waterline tile removed and substrate prepped. New glass mosaic tile was installed (a blue-green iridescent) — one full day working the 110-foot perimeter.
Day 5: Old coping removed, beam cleaned and leveled. New tumbled travertine coping set and grouted.
Day 6: Surface application day. A five-person crew applied StoneScapes Mini Pebble in Tropics Blue across the full shell in a single continuous session — start to finish in about seven hours. The fill hose started trickling into the deep end before the crew left.
Days 7–12: Slow fill and initial cure. The pool was checked on days 8 and 10 to monitor the curing process and test water chemistry.
Day 13: Pool reached operating level. Startup chemistry adjusted. Pump running 24/7.
Day 18: Water clear, chemistry stable, swimming started.
Total: 18 days from drain to swimming, with 6 days of active crew work on site. The homeowner said the documentation helped them plan their work-from-home schedule around the noisiest days (days 2–3).
The National Plasterers Council recommends a minimum 28-day startup chemistry protocol for all new cementitious pool finishes, with specific pH, calcium, and alkalinity targets that protect the fresh surface during its most vulnerable curing period — a process we follow on every resurfacing project.
If you're considering a resurface and want to understand what your specific project would involve, we'll walk the pool, identify any prep or repair work that's needed, and give you a clear picture of the process and timeline.
Use the contact form or call to set up a consultation.
Ready to Talk About Your Pool?
Get a free, no-obligation consultation from Cornerstone Pool & Remodel.
Request a Free Quote